Indiana University Network Science Institute
Enso
Documentation Pages
Managing Interviews Using Enso
Table of Contents
- Components of the Interview Administration Page
- Tasks for Managing Interviews in Enso
- Steps for Conducting Follow-Up Interviews
- Exporting Data
View the Project on GitHub bs22iu/Enso_docstest
Managing Interviews Using Enso
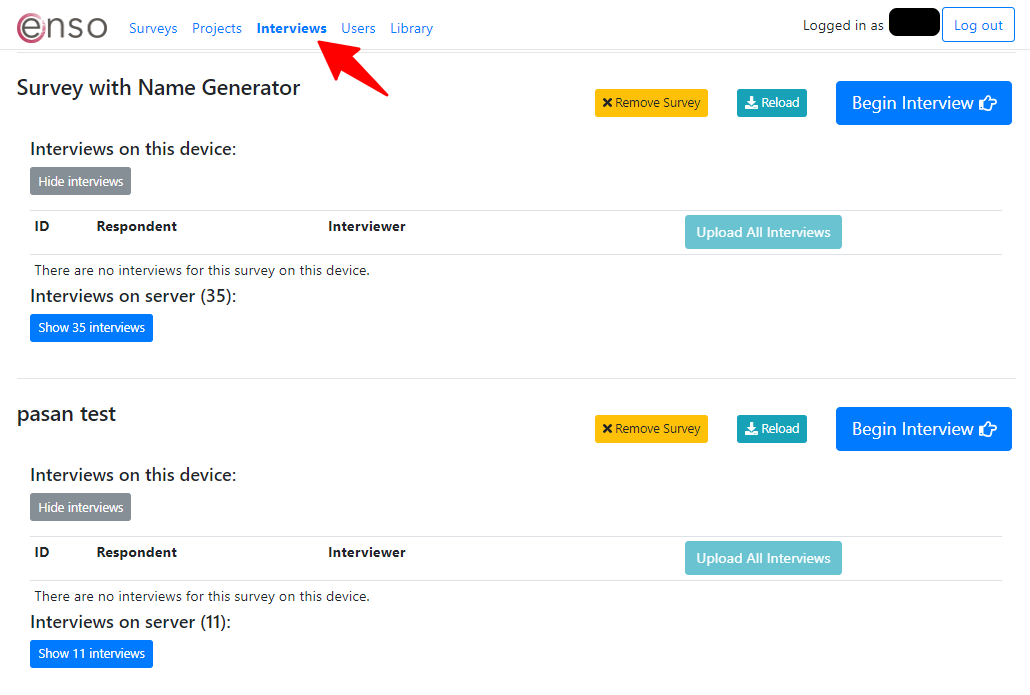
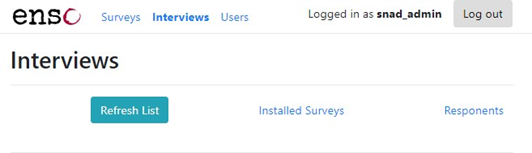
First, click on the blue Interviews button in the top menu (as shown in the image below). You’ll see an interview administration page that looks something like this:
From this page, you will be able to accomplish the following tasks, in three categories:
- Conducting interviews
- Begin new interviews
- Continue interviews that have been interrupted
- Managing interview data
- Check to make sure interview data are uploaded to the server
- Upload interview data to server
- Delete interview data from the tablet
- Managing installed surveys
- Reload surveys to the tablet (“device”)
- Install new surveys to the tablet (“device”)
The next sections walk through the components of this page first, then steps for each task in each category.
Components of the Interview Administration Page
Survey information
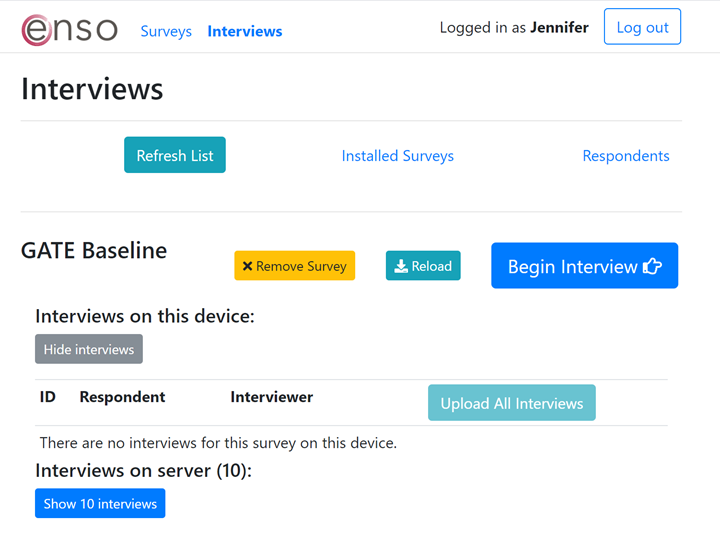
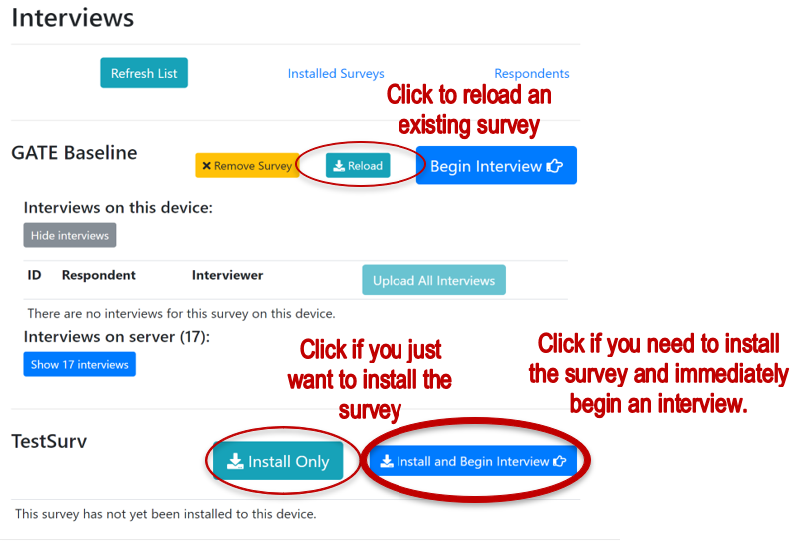
Each row on this page is a separate survey that you have the ability to administer. Currently, you will only see GATE Baseline. Eventually there will be follow-up surveys as well.
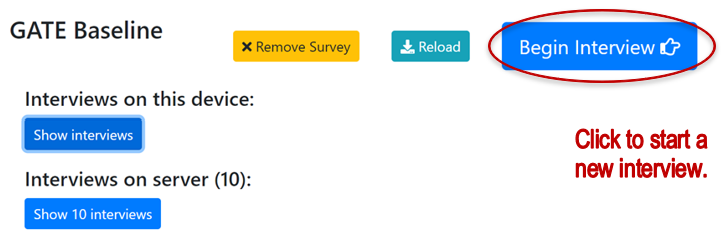
For each survey, you’ll see the following tools/buttons on the right hand side:
- Remove survey
- Reload
- Begin Interview
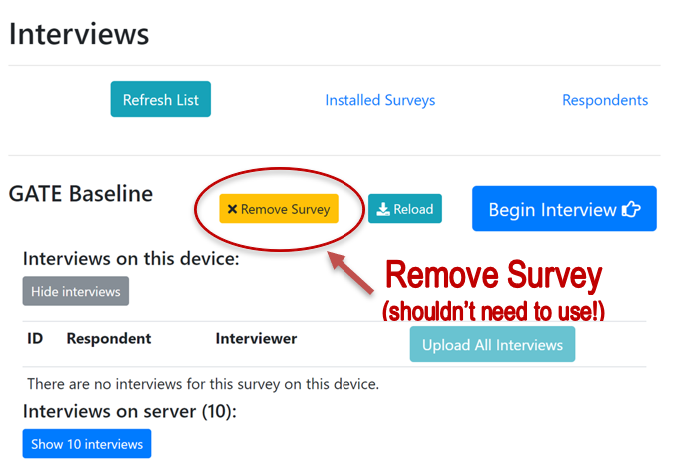
Remove Survey
-
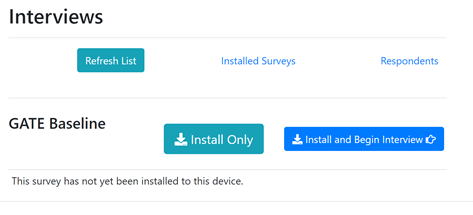
The “Remove Survey” button (shown below) will remove the survey from the tablet and you won’t be able to administer interviews. If you remove the surveys from the tablet, the interview page will look like the screen below:
-
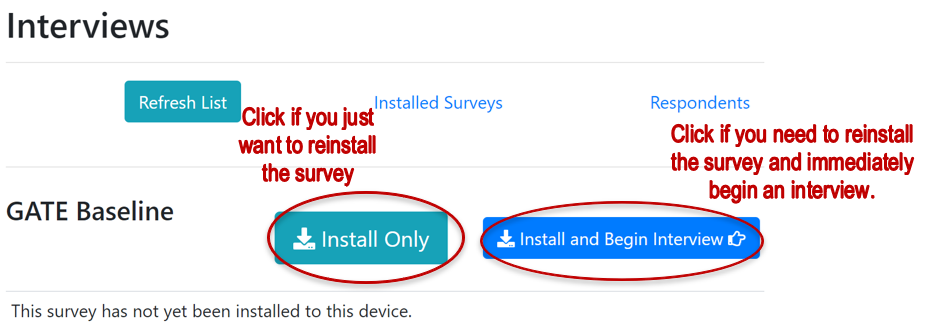
Restore Survey
- If you accidentally click the remove survey button, you can restore the survey to the tablet, click “Install Only” as seen below.
- If you want to restore the survey to the tablet AND begin an interview, click “Install and Begin Interview.”
Helpful Tip
Helpful Tip
You must be connected to wifi or data in order to use the restore survey feature. It will not work if you are not connected to the server via wifi. Be sure to not accidentally remove the survey when you’re out in the field away from wifi!
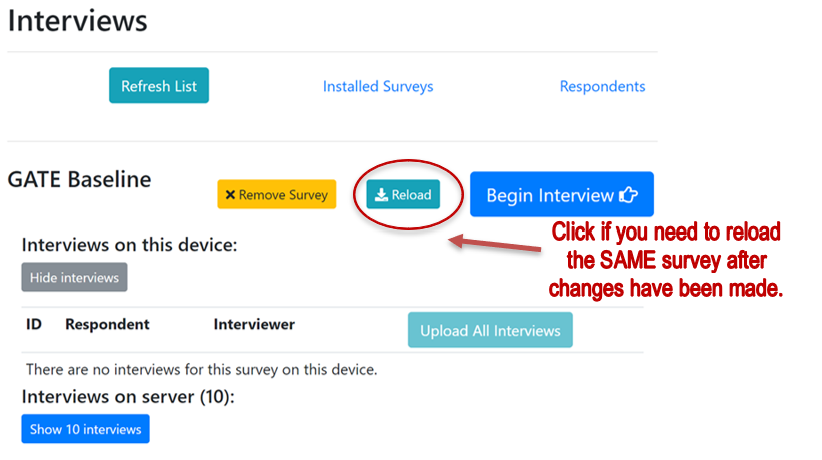
Reload
- The “Reload” button reloads the same survey to the tablet, which would only need to be used if we change the survey in some way and update it.
- To reload a survey, **make sure you are connected to the server** and click Reload.
Begin Interview
This button does exactly what it says; it takes you to the first page of the survey. Use this every time you want to start a new survey.
Interview data administration
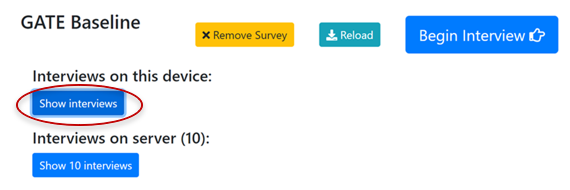
On the left side of the screen, under each survey name you’ll see the subtitle “Interviews on this device” with a button that reads “Show interviews” and a subtitle “Interviews on server (xx)” with a button that reads “Show xx interviews.” See below:
(xx = the TOTAL number of interviews stored on the server for this survey)
- Interviews on this device indicates how many interviews using this survey have been conducted and are stored on this tablet (device). They may or may not be uploaded to the server as well.
- Interviews on server indicates how many interviews using this survey have been conducted and are uploaded from ALL TABLETS to the server. This will show you the total number of interviews conducted using this survey, by ALL INTERVIEWERS.
Next, let’s see how to view the list of interviews on the device and on the server.
View interviews on this device
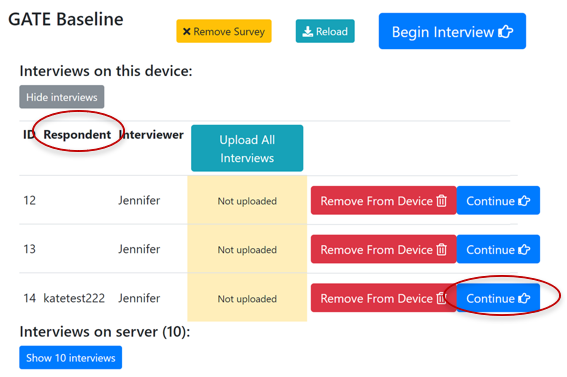
In this example, we are looking at the interviews conducted using the SNAD Study Partner BL survey on this particular tablet. To do this, we clicked Show interviews under the “Interviews on this device” subtitle.
First, you’ll see that now the Show interviews button is greyed out and says Hide interviews. If you no longer want to see the list of interviews, you can click this to hide them and clean up your screen view.
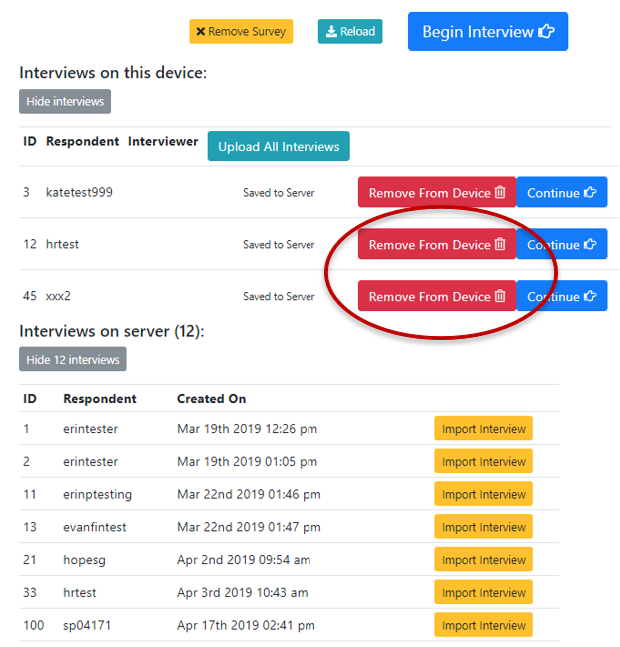
You’ll see 6 columns below: ID, Respondent, Interviewer, Upload All Interviews, Remove From Device, and Continue. Each column is detailed below.
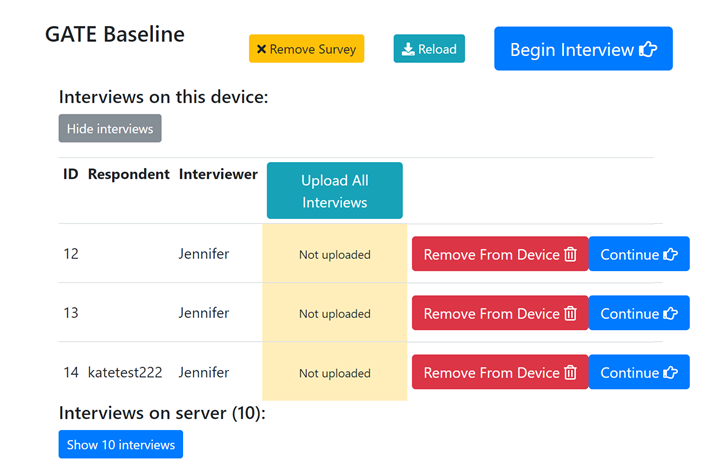

- ID: A unique ID assigned by Enso to each respondent who is interviewed
- Respondent: The ID used by study personnel for each respondent, which is entered on the first screen of the survey
- Interviewer: The username of the interviewer who conducted the interview
- Upload all interviews: This button uploads all interviews to the server if they have not already been uploaded. In this example, all of the interviews are “Not uploaded” yet. More information to come on this.
- Remove From Device: This will remove the interview from the tablet. You can delete an interview once it has been uploaded to the server. There are plenty of warnings about deleting interviews that have NOT been uploaded to the server yet, so don’t worry about accidentally deleting anything! More to come.
- Continue: Click to re-enter an interview that has already been started and was aborted for some reason. It will take you back to the last page for which data are saved, which would be the last page for which you clicked “Next page.”
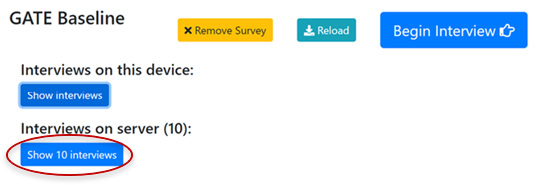
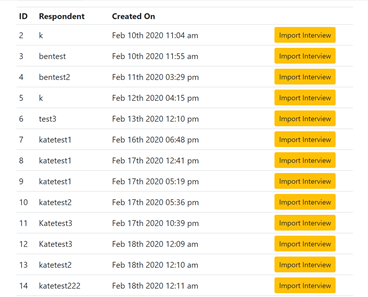
View interviews on server
In this example, we are looking at ALL of the interviews conducted using the GATE Baseline survey. To do this, we clicked Show interviews under the “Interviews on server” subtitle.
First, you’ll see that now the Show interviews button is greyed out and says Hide XX interviews. If you no longer want to see the list of interviews, you can click this to hide them and clean up your screen view.
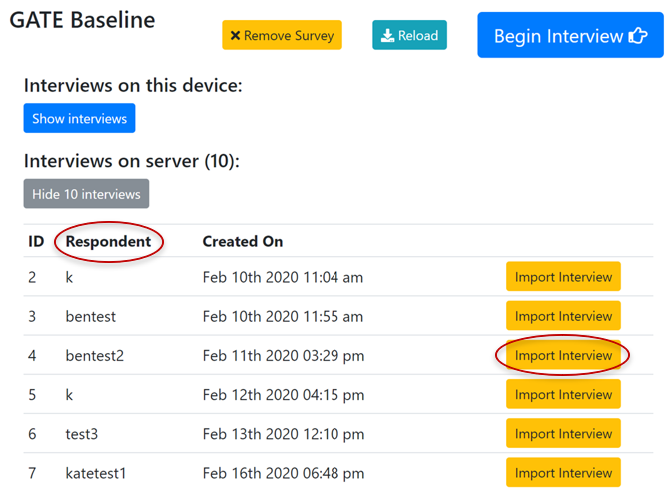
You’ll see 4 columns below: ID, Respondent, Created On, and Import Interview.

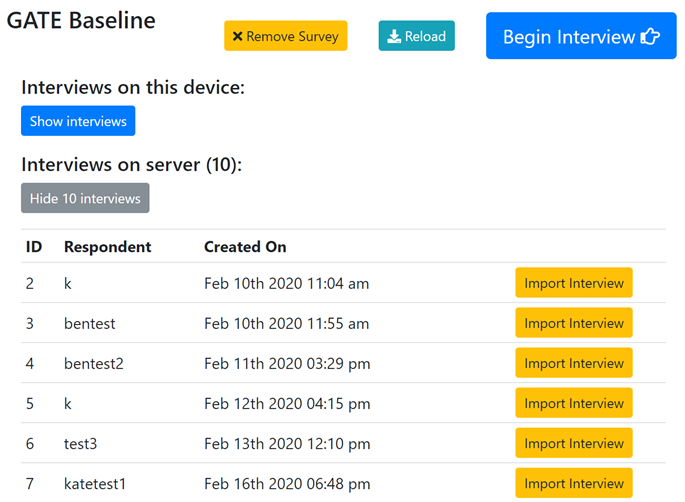
- ID: The unique ID assigned by Enso to each respondent who is interviewed
- Respondent: The ID used by study personnel for each respondent, which is entered on the first screen of the survey, as explained above.
- Created on: Tells you the date and time the interview began.
- Import Interview: This button will load an interview from the server to the tablet. This will only be important when conducting follow-up interviews that use data from a previous interview. We will go over this in detail once longitudinal surveys have begun.
Tasks for Managing Interviews in Enso
- Conducting interviews
- Begin new interviews
- Continue interviews that have been interrupted
- Managing interview data
- Check to make sure interview data are uploaded to the server
- Upload interview data to server
- Delete interview data from the tablet
- Managing installed surveys
- Reload surveys to the tablet (“device”)
- Install new surveys to the tablet (“device”)
Conducting interviews
Begin new interview
You’ll start every new interview from the Interviews page. To do so:
- Go to the correct survey that you want to administer, for either the Focal Subject or the Study Partner.
-
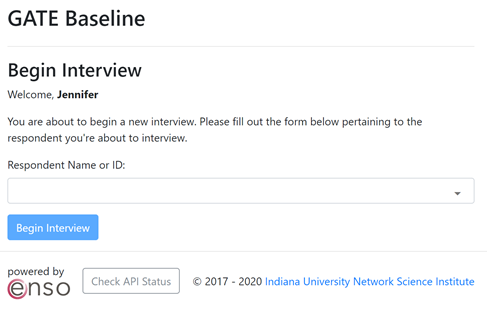
Click the blue Begin Interview button in the row for that survey.
- After clicking you’ll see the screen shown below. Type the unique study ID for the participant you are about to interview into the “Respondent Name or ID” box and CLICK ENTER on your keyboard or the blue “Begin Interview” button!!
- NOTE: If you don’t click Enter or Begin Interview, it won’t save the number you entered!
New respondents
- If you are starting a BASELINE interview with a NEW respondent, make sure that when you enter the study ID, you see the words “NEW Respondent” below the text box, as seen below.
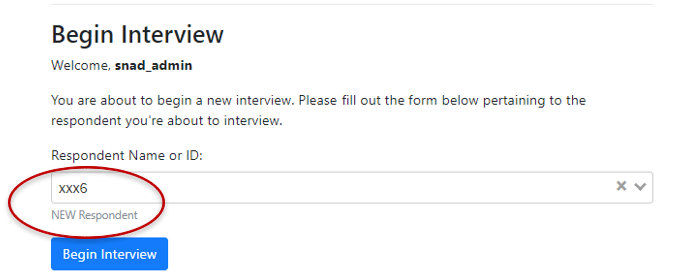
Existing respondents
- If you are starting a FOLLOW-UP interview with an EXISTING respondent, make sure that when you enter the study ID, you see the words “NEW Respondent” below the text box.
- There should NOT be any BASELINE interviews with EXISTING respondents.
Continue interviews that were interrupted
You can continue an interview that has been interrupted. To do so:
- Go to the correct survey that you want to administer (GATE Baseline).
- Go to “Interviews on this device”
-
Click the blue Show interviews button in the row for that survey, as seen in this example:
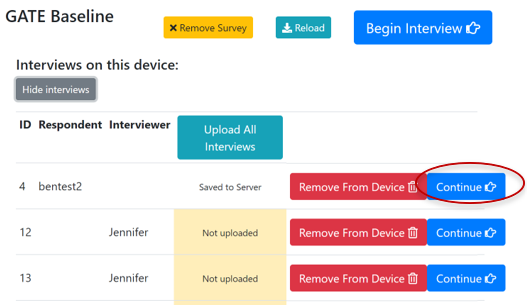
- Find the Survey ID of the respondent you want to interview in the Respondent column (see below).
- Click on the blue Continue button to continue with that survey (e.g., continuing an interview with respondent katetest222, below).
-
If you DO NOT SEE the respondent in that list, go to Step 7.
-
If you don’t see your respondent ID in the list of “Interviews on this device,” then click on the blue “Interviews on server”
- Find the Survey ID of the respondent you want to interview in the Respondent column (see below).
-
Click on the yellow Import Interview button for that respondent (e.g., respondent bentest2, below).
- Go back to “Interviews on this device” and click the blue Show Interviews button if it is not already open.
- You should now see the respondent listed in the interviews on the device (e.g., bentest2, below). You can click on the blue Continue button to continue the interview. It will take you to the last page where you left off.
Helpful Tip
Helpful Tip
- If you have any trouble with network members not appearing where they should in questions, you may need to go back to the beginning and simply click “next page” SLOWLY until you reach the part of the survey you have not yet completed.
- Moving slowly through the pages is important.
IF you accidentally start a NEW interview instead of continuing an old interview:
- You’ll notice because it will start from the first page. This won’t work!! Take the following steps:
- Close out of the new interview.
- Return to the interview page and go to Show interviews on this device.
- You will see your respondent ID listed twice. Find the one that comes FIRST in the list (also check the date and time), and click Continue to continue from the correct place.
- If you DON’T see the ID listed twice, then you need to import the interview from “Interviews on server,” and Continue from the imported interview.
Managing Interview Data
- If you are connected to wifi, each interview will upload when you click the “Finish Interview” button in the survey.
- If you are NOT connected to wifi, you will need to upload the interviews** to the server.
Make sure data are uploaded to server
Important Note
Important Note
All of these steps need to be conducted with a wifi connection!!
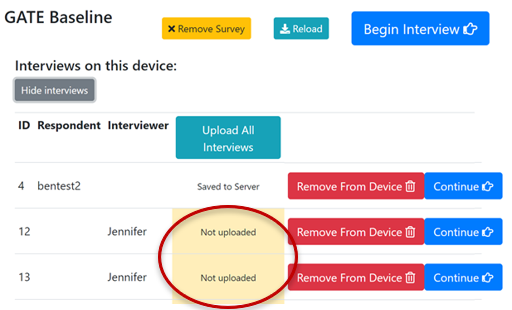
To check to see what data need to be uploaded:
- Go to the interview page and click on Show interviews under “Interviews on this device.”
- Check the column with the “Upload All Interviews” heading.
-
Interviews that you have conducted but have not yet been uploaded will show the beige “Not uploaded” alert, as in the screenshot below:
Upload interview data to server
To upload these interviews:
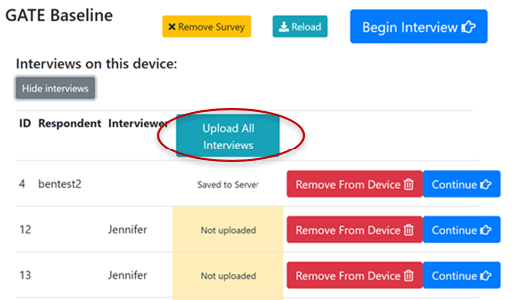
- Click on the green/blue Upload All Interviews This will upload any data to the server. This will also automatically remove all of the interview data from the device.
-
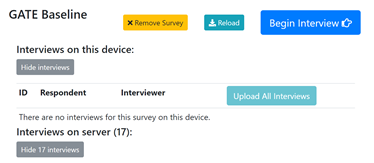
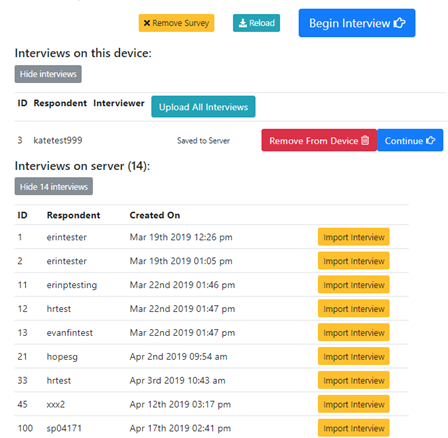
Click on the Show XX Interviews button under “Interviews on server (XX).” You should now see all of the interviews there, and none under “Interviews on this device” (see example below).
Delete interview data from tablet
As mentioned above, all interview data are deleted from the device when you click “Upload All Interviews.” This is the primary way you will delete data from the device, and you should do this weekly or so, just to free up space on the device.
However, if you have an interview on the device that you want to delete without uploading any others, you can do so.
For example, see the image below. Perhaps you are through with “hrtest” and “xxx2” interviews, but you want to keep “katetest999” on the device because you have to continue the interview. All three are already saved to the server, which we know because it says “Saved to Server” in each row, although they do not show in the “Interviews on server list” because they are currently on the device.
-
Click on the red Remove From Device button next to “hrtest” and “xxx2.”
-
Check the “Interviews on server” list (below). You’ll now see “hrtest” returned to its position as ID 12, and “xxx2” returned to its position as ID 45. The “katetest999” interview is still on the server for your use.
Don’t worry about accidentally deleting an interview that has not been uploaded. Here’s what you’ll see if you try to:
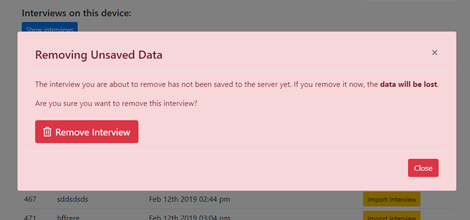
Just click Close and go back about your business! It’s hard to delete data.
Managing Installed Surveys
You should only need to install a survey once, but when we update the Enso app or a survey for any reason, you will likely need to install or reload the surveys. We will update the survey after today’s training, so you’ll have to do this!
You can see the list of installed surveys by clicking “Installed Surveys” at the top of the Interviews page.
Installing a survey for the first time
- Go to the Interviews page (see example below).
- Find the name of the survey you want to install (e.g., TestSurv).
- Click “Install Only” if you aren’t immediately conducting an interview.
-
Click “Install and Begin Interview” if you are ready to conduct an interview.
Reloading a survey after update/removal
- Go to the Interviews page (see example above).
- Find the name of the survey you want to install (e.g., GATE Baseline).
- Click “Reload”.
- That’s it! You’re ready to conduct an interview.
Steps for Conducting Follow-Up Interviews
In Enso, you can conduct follow-up interviews that include data from the previous interview. There are a few steps to make this work properly.
Enso saves data to the respondent. To carry networks forward from one survey to another, we MUST ensure that the respondent is installed on the device.
Steps for first surveys in Enso versus existing user
For respondents who have had all of their network data collected in Enso, you simply have to:
- Make sure that the proper follow-up survey is installed on the tablet.
- Make sure the respondent is installed on the We’ll go over this here.
For respondents who have NEVER HAD their network data collected in Enso, you will have to:
- Enter network data for the respondent into the previous survey in Enso.
- That is, if you are doing Focal Subject T3 as the first Enso survey for this respondent, you need to respond to the name generating questions in the previous survey in Enso (Focal Subject T2) and the final network questions at the end of the survey.
- Make sure that the proper follow-up survey is installed on the
- To review steps for installing a survey, please see Page
- Make sure the respondent is installed on the
Important Note
Important Note
Installing surveys and respondents requires a data/wifi connection!!!
Installing respondent to device for follow-up
Go to the top of the Interviews page and click on Respondents (see below).
You’ll see a pop-up list like the one below. This list has columns for Name, Alter Count, Alter Groups, and whether the respondent is installed on the device.

- Name is the ID that you all have given the respondent, entered for each survey.
- Alter Count is the number of network members counted for that respondent.
- Alter Groups is a list of the alter groups that network member is a part of.
You only need to worry about Name and the column for Install Respondent.

The final column will say “Installed”/”Re-install” if the respondent is already installed on the device, and “Install Respondent” if the respondent is NOT on the device.
- Find the respondent ID in the Name
- If the respondent is not installed, click Install
- If the respondent is already installed, you may scroll through the list of Alter Groups and make sure the ones from the previous survey are present. If not, you can click Re-Install.
You should be ready to go!
Exporting Data
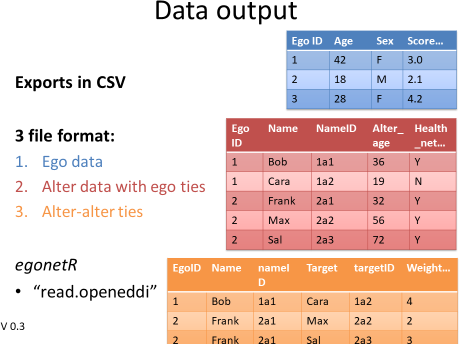
Enso saves data in three files:
- Ego data – like standard survey data, with one row per ego, and each column is a variable
- Alter data with ego ties – A row for each alter that includes the EgoID for linking. Each column is a variable with values per alter.
-
Alter ties – a row for each alter pair, with columns as variables of values for alter ties.
To download data:
- Go to “Surveys.”
- Find the survey you would like to get data
- Click the “Export Data”
- This will open a new window with buttons to download “Ego Data,” “Alter Data,” and “Alter-Tie Data.”
- Click each, rename the file, and save it to your local